


 Abrites AVDI J2534
 Actia Multi-Diag
 Autoland iSCAN
 Bobcat Diagnostic Kit
 BMW ENET
 Bosch Mastertech II J2534
 Bosch MTS 6531
 CAN CLIP RLT2002
 CarDAQ-Plus 3
 Cummins INLINE Datalink
 Dearborn Protocol Adapter (DPA) 5
 Delphi/Autocom DS150E
 DrewLinQ
 Volvo VIDA DiCE
 Derelek USB DIAG 3
 Electronic Data Link (EDL) 2
 Electronic Data Link (EDL) 3
 GM MDI 1
 GM MDI 2
 HEX-V2 VCDS VAG-COM
 Isuzu IDSS IDS MX1
 Isuzu IDSS IDS MX2
 Iveco Eltrac E.A.SY. ECI
 MaxiFlash Elite J2534
 MB Star C6
 Mongoose J2534
 Nexiq USB-Link 1
 Nexiq USB-Link 2
 Nexiq USB-Link 3
 Noregon DLA+ 2.0
 Porsche PIWIS TESTER 3 (PT3G)
 PSA LEXIA 3
 SAE J2434
 Scania VCI 3
 Scanmatik 2 PRO
 SD Connect Multiplexer
 Tactrix OpenPort 2.0
 Toyota TIS Mini VCI
 VAG ODIS VAS5054 Clone
 VAG ODIS VAS6154 Clone
 Volvo VOCOM 1
 Volvo VOCOM 2
 Xentry VCI
 Yanmar Diagnostic Interface Box (IFBOX)
-1")
Technical Highlights
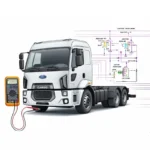
Vehicle coverage: Škoda Octavia III (2013–2014)
Engines:
1.6 TDI CR (66 kW / 77 kW / 81 kW)
2.0 TDI CR (105 kW / 110 kW / 135 kW)
Fuel system: Common Rail diesel injection
Manual type: OEM factory workshop manual
Content depth: Full mechanical, diagnostic, and system-level procedures
Language: English
Edition: 10.2013
Delivery
The download link will be sent to your email instantly after payment.
Full Contents
Technical data
Technical data
Engine number
Engine characteristics
Self-diagnosis
Self-diagnosis, safety measures, cleanliness regulations and directions
Self-diagnosis
Supplementary instructions and assembly work on vehicles with air conditioning system
Safety precautions when working on fuel supply system
Safety measures for working on vehicles with start/stop system
Regulations concerning cleanliness when working on fuel supply / fuel injection system
Regulations concerning cleanliness when working on the exhaust gas turbocharger
General instructions for charge air system
Removing and installing engine
Removing and installing engine
Removing and installing engine trim panel
Removing engine
Securing the engine to the assembly stand
Installing engine
Assembly bracket
Assembly overview – assembly mountings
Supporting the engine in its installed position
Removing and installing engine mount
Removing and installing engine support
Removing and installing pendulum support
Checking and adjusting the assembly bracket
Crankshaft group
Removing and installing V-ribbed belt and toothed belt
V-ribbed belt – summary of components
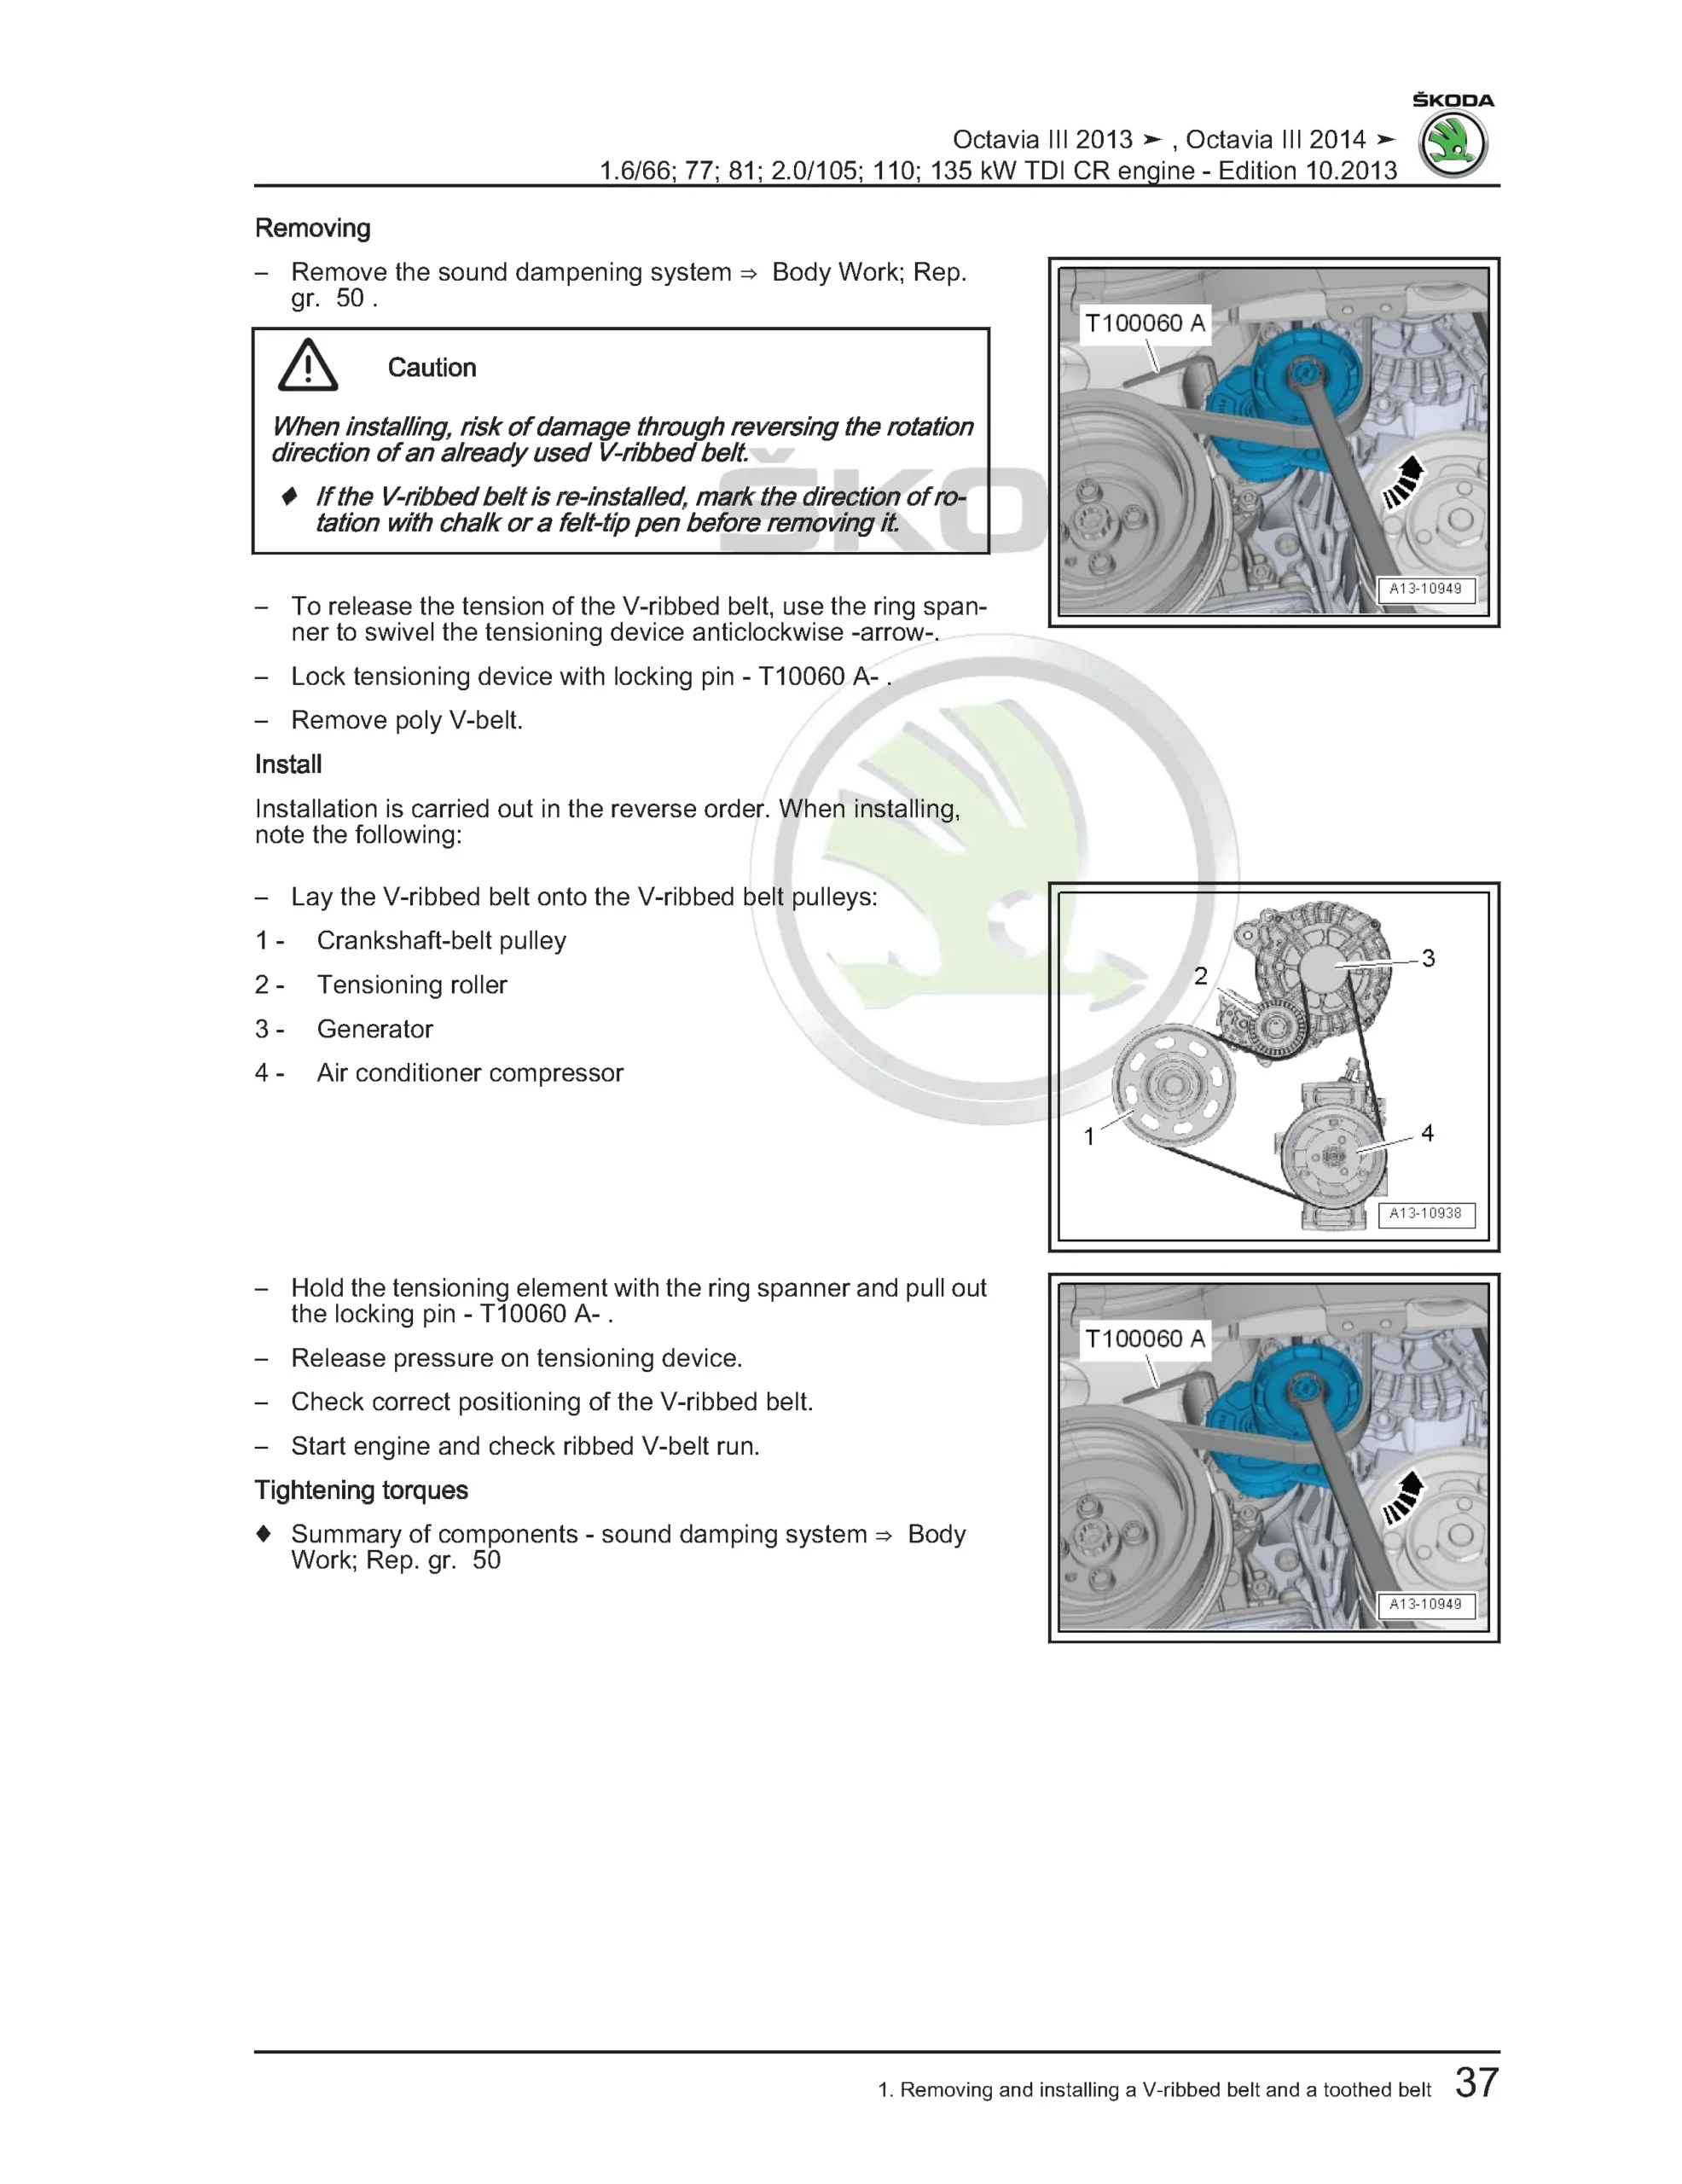
Removing and installing poly V-belt
Removing and installing crankshaft belt pulley
Removing and installing tensioning device for V-ribbed belt
Removing and installing bracket for auxiliary units
Toothed belt system
Summary of components – toothed belt guard
Assembly overview – toothed belt drive
Removing and installing top toothed belt guard
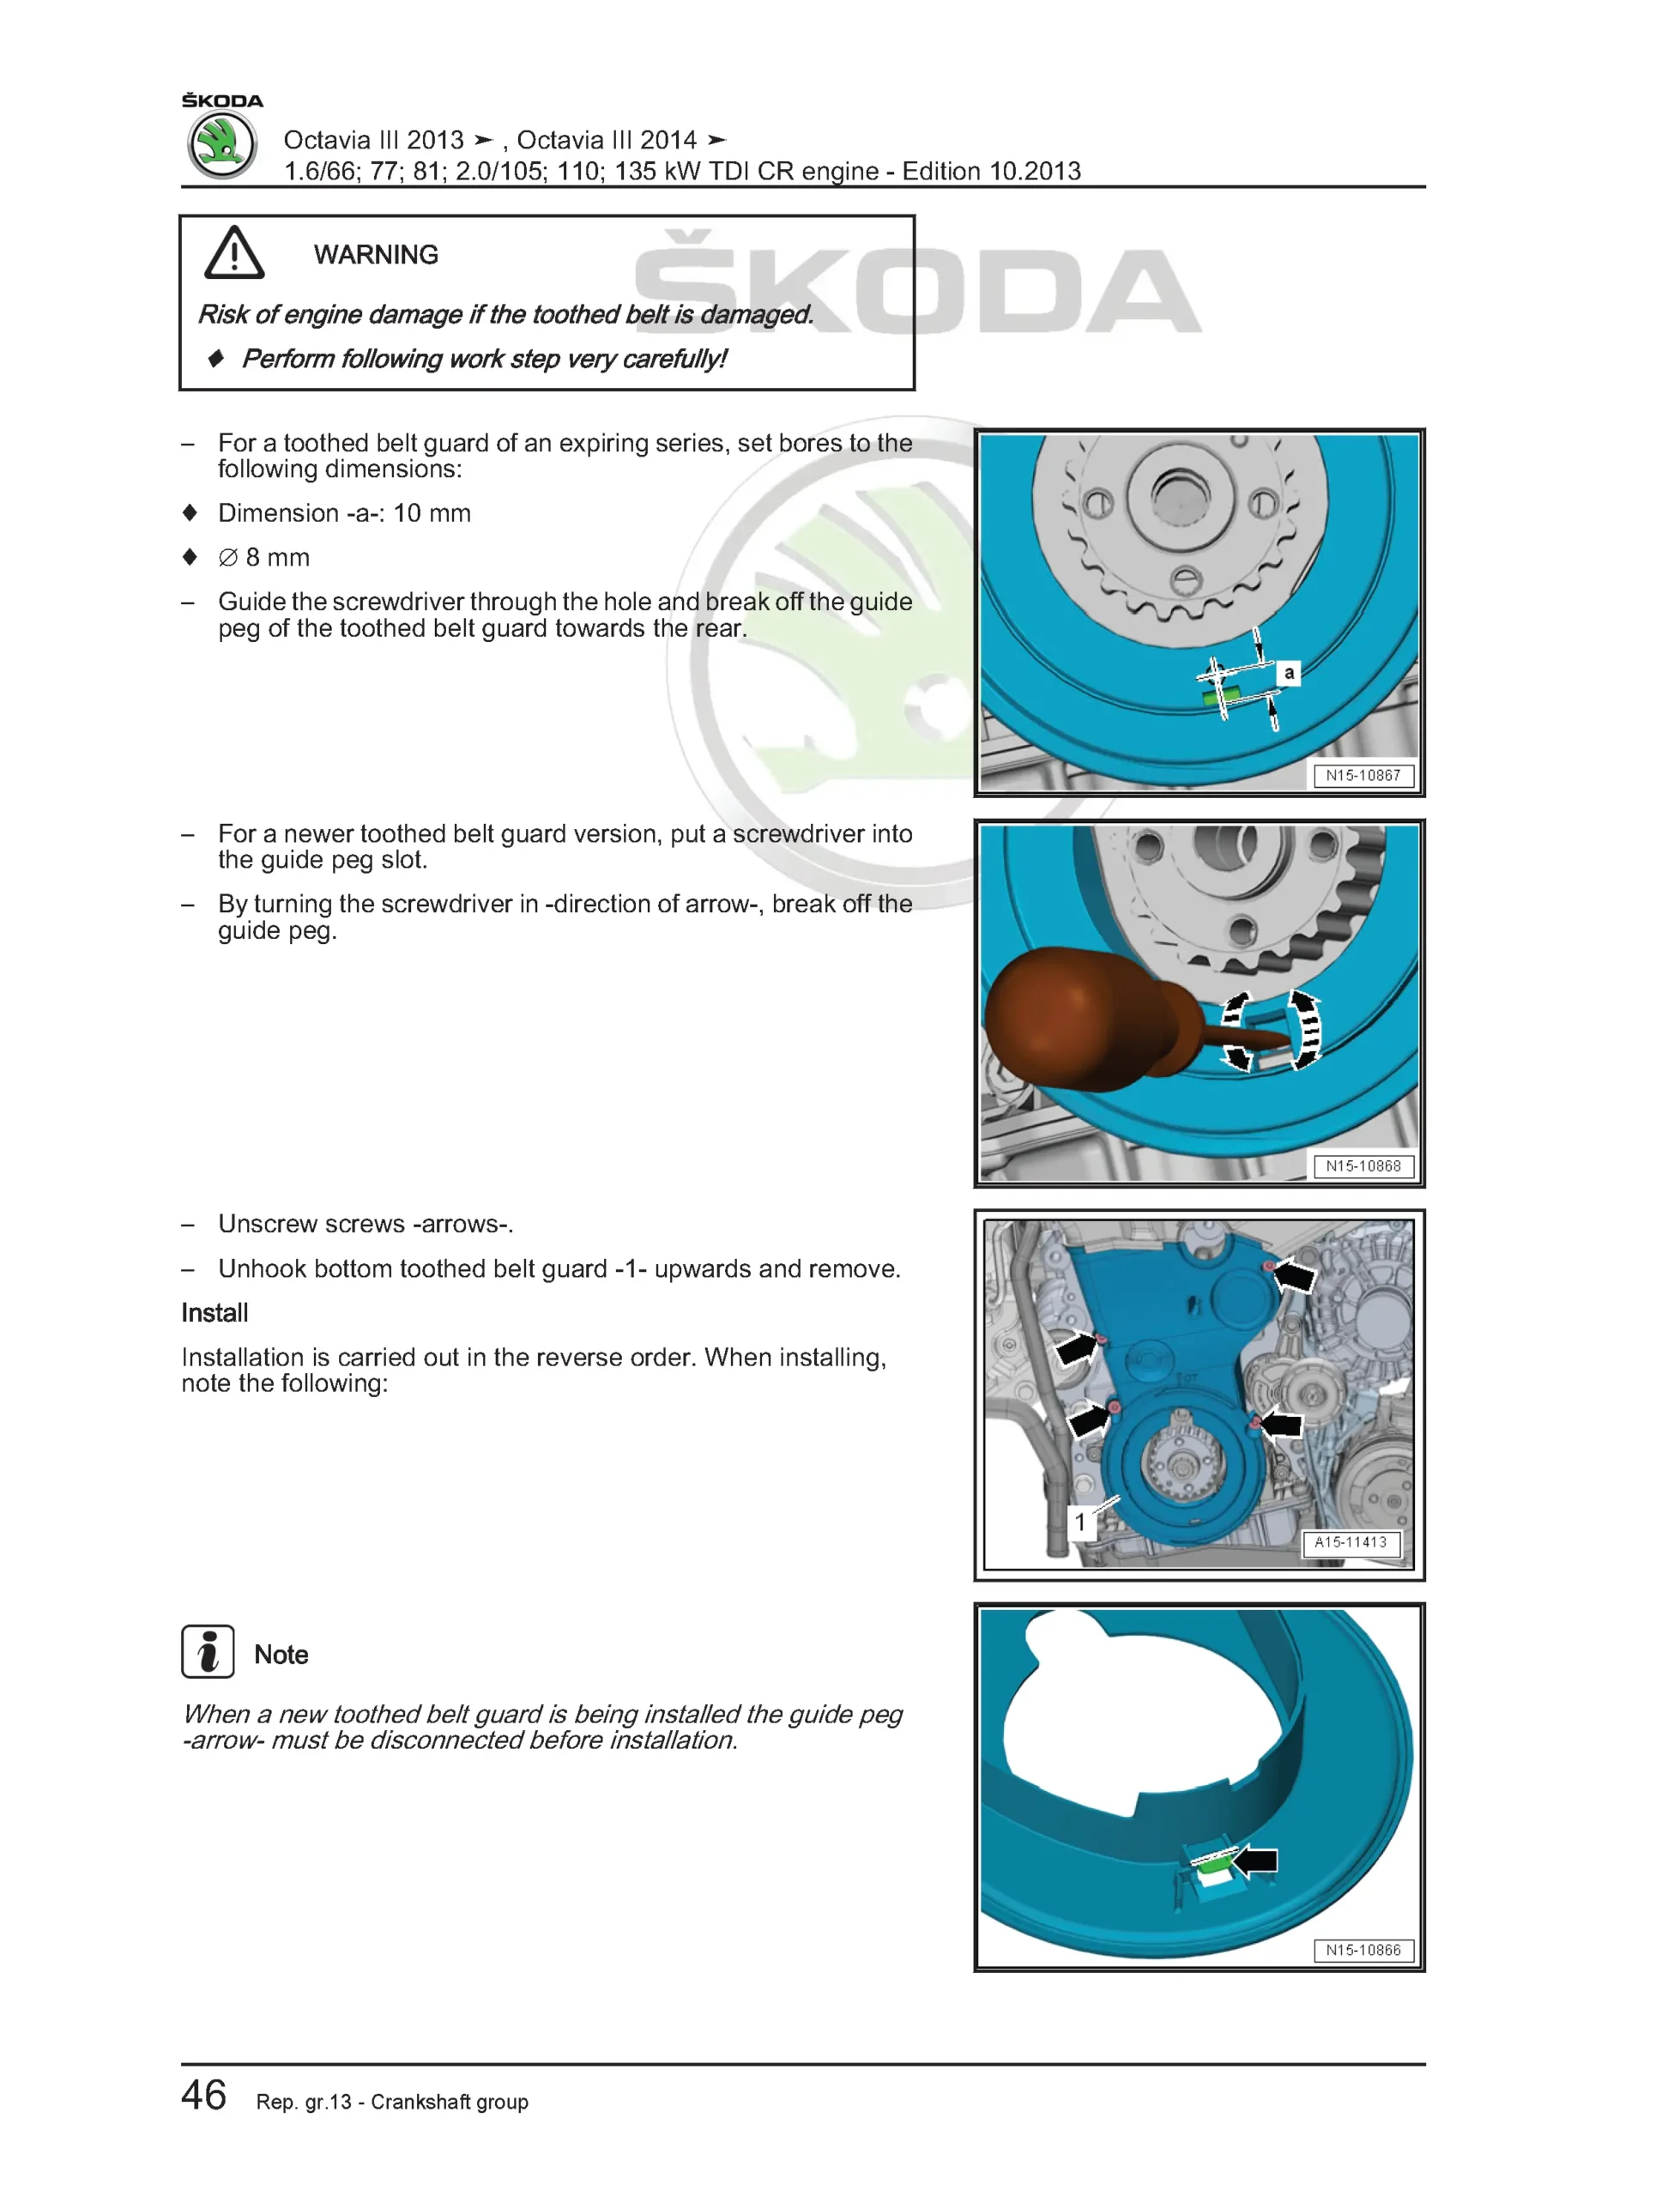
Removing and installing bottom toothed belt guard
Removing toothed belt from camshaft
Removing and installing toothed belt
Sealing flange and flywheel
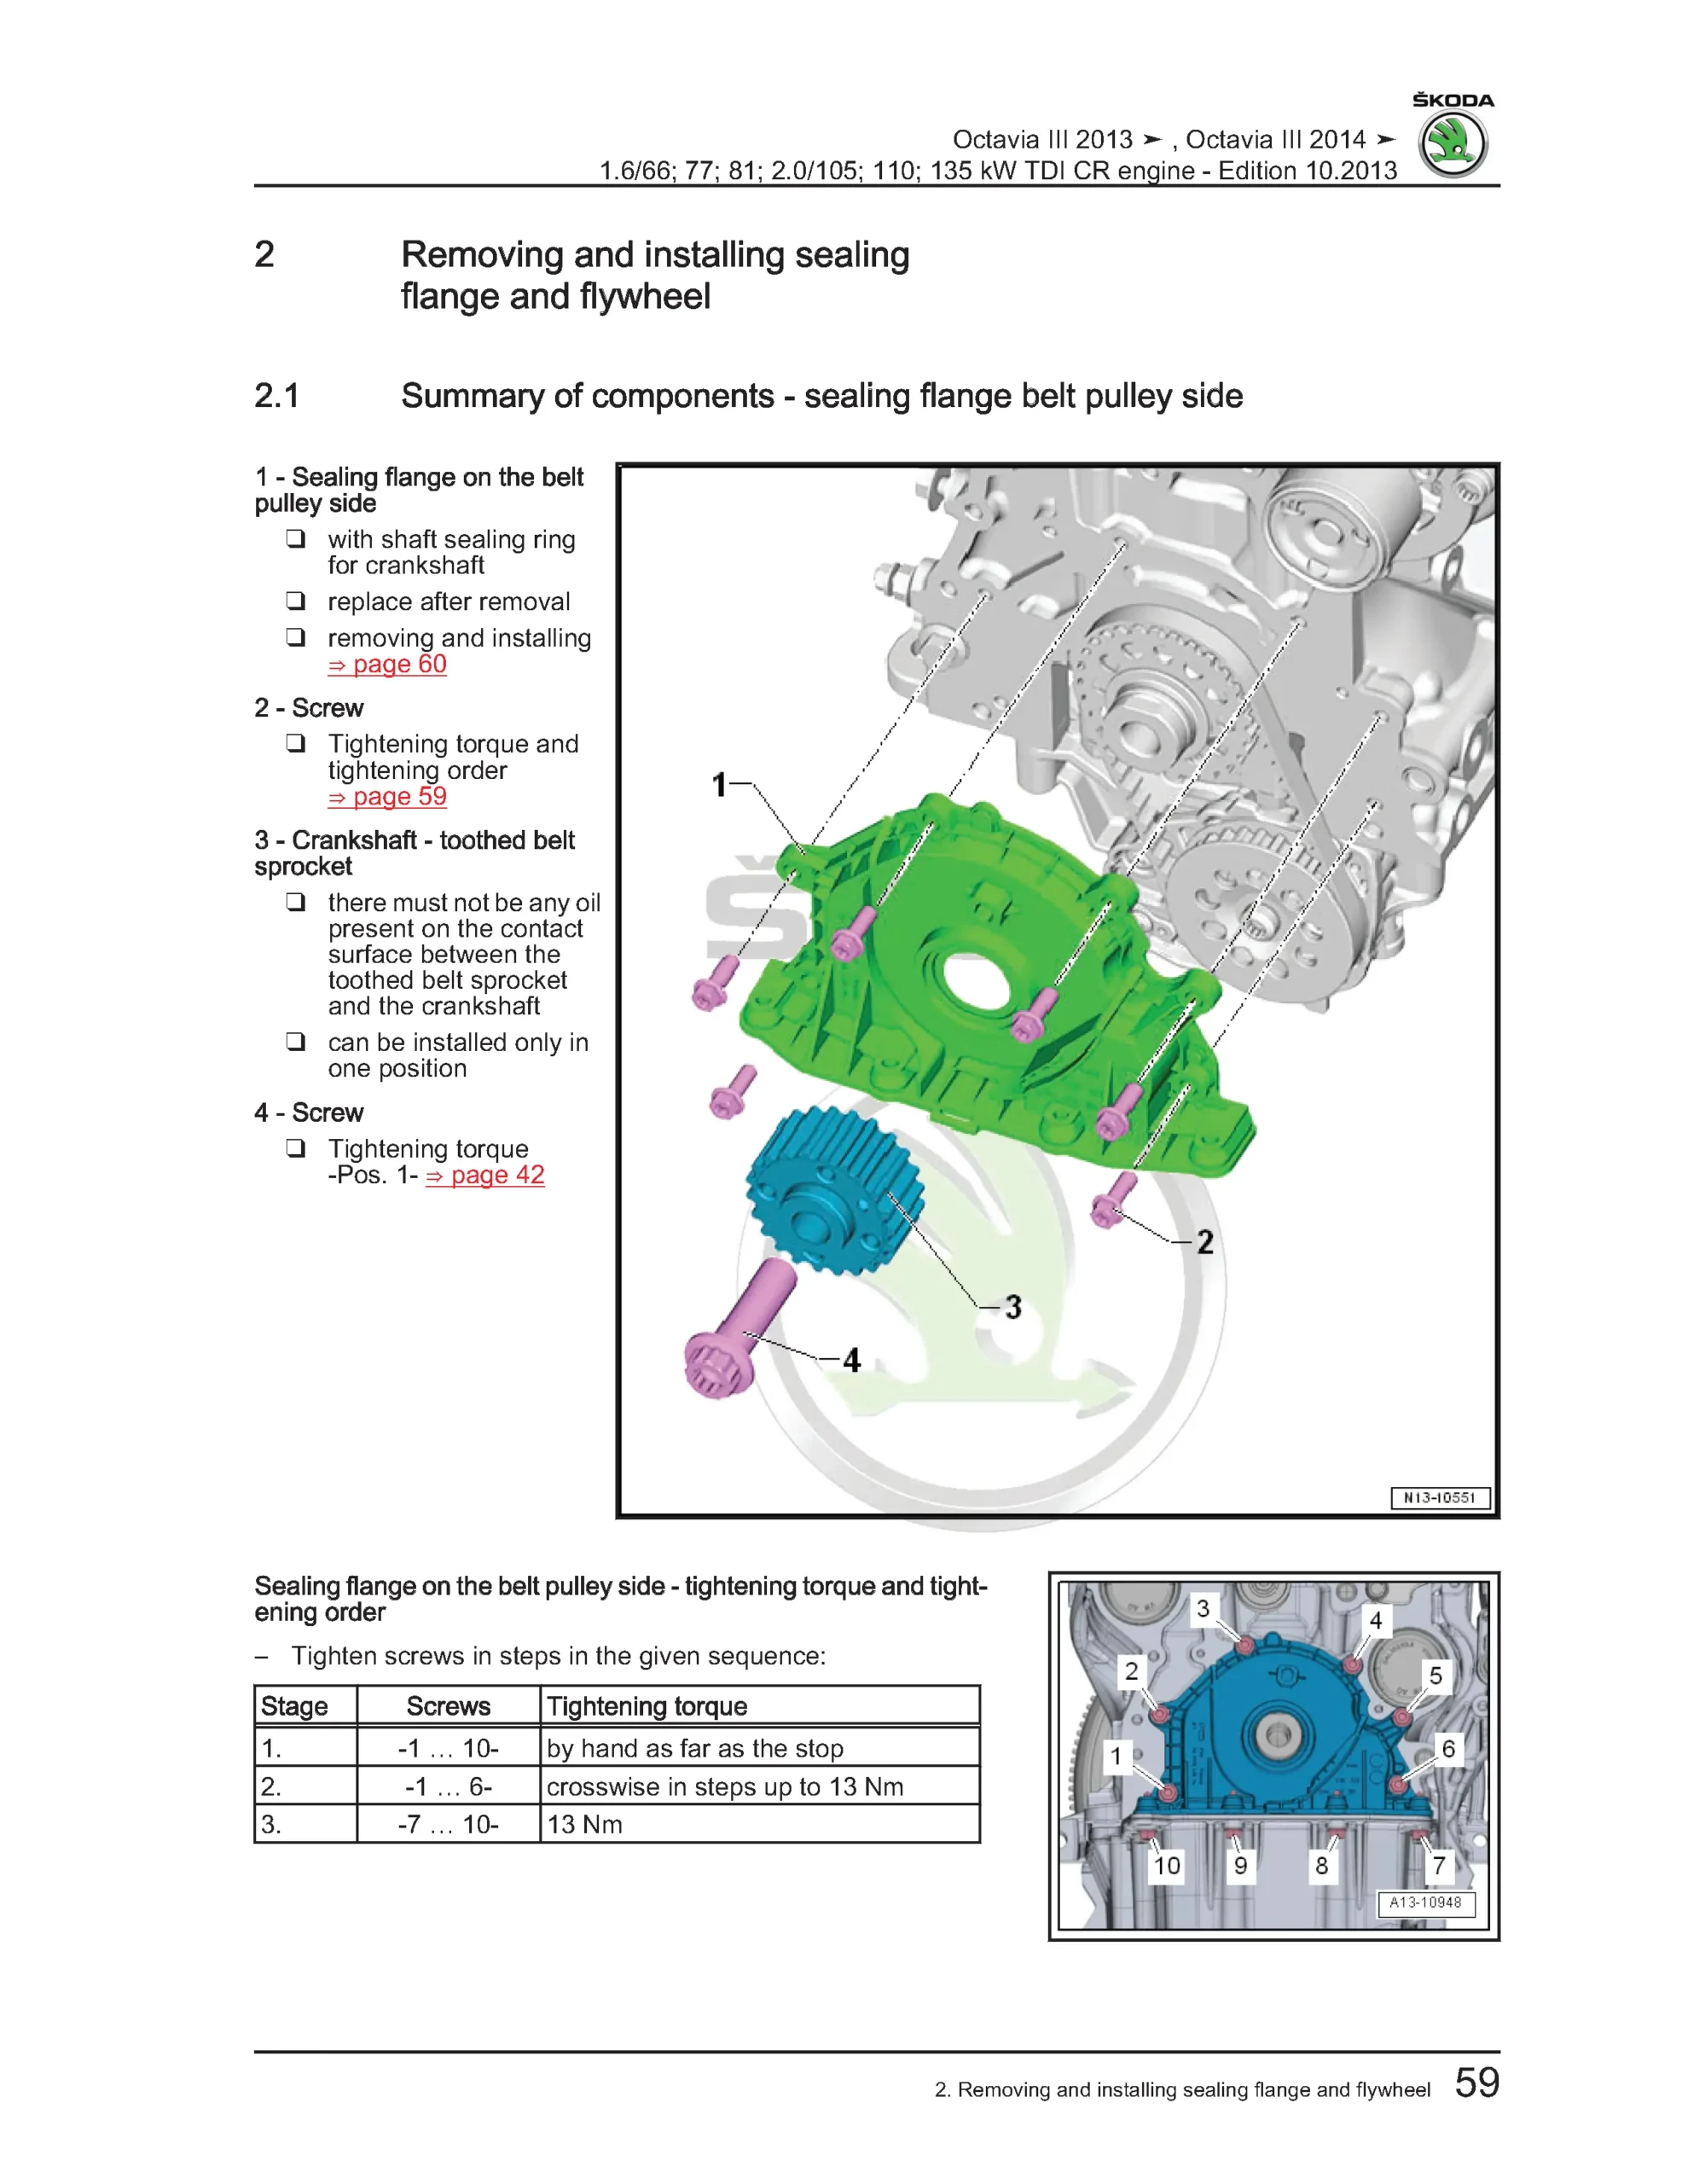
Summary of components – sealing flange belt pulley side
Removing and installing sealing flange on belt pulley side
Summary of components – gearbox side and flywheel
Removing and installing sealing flange on gearbox side
Removing and installing flywheel
Crankshaft, piston and conrod
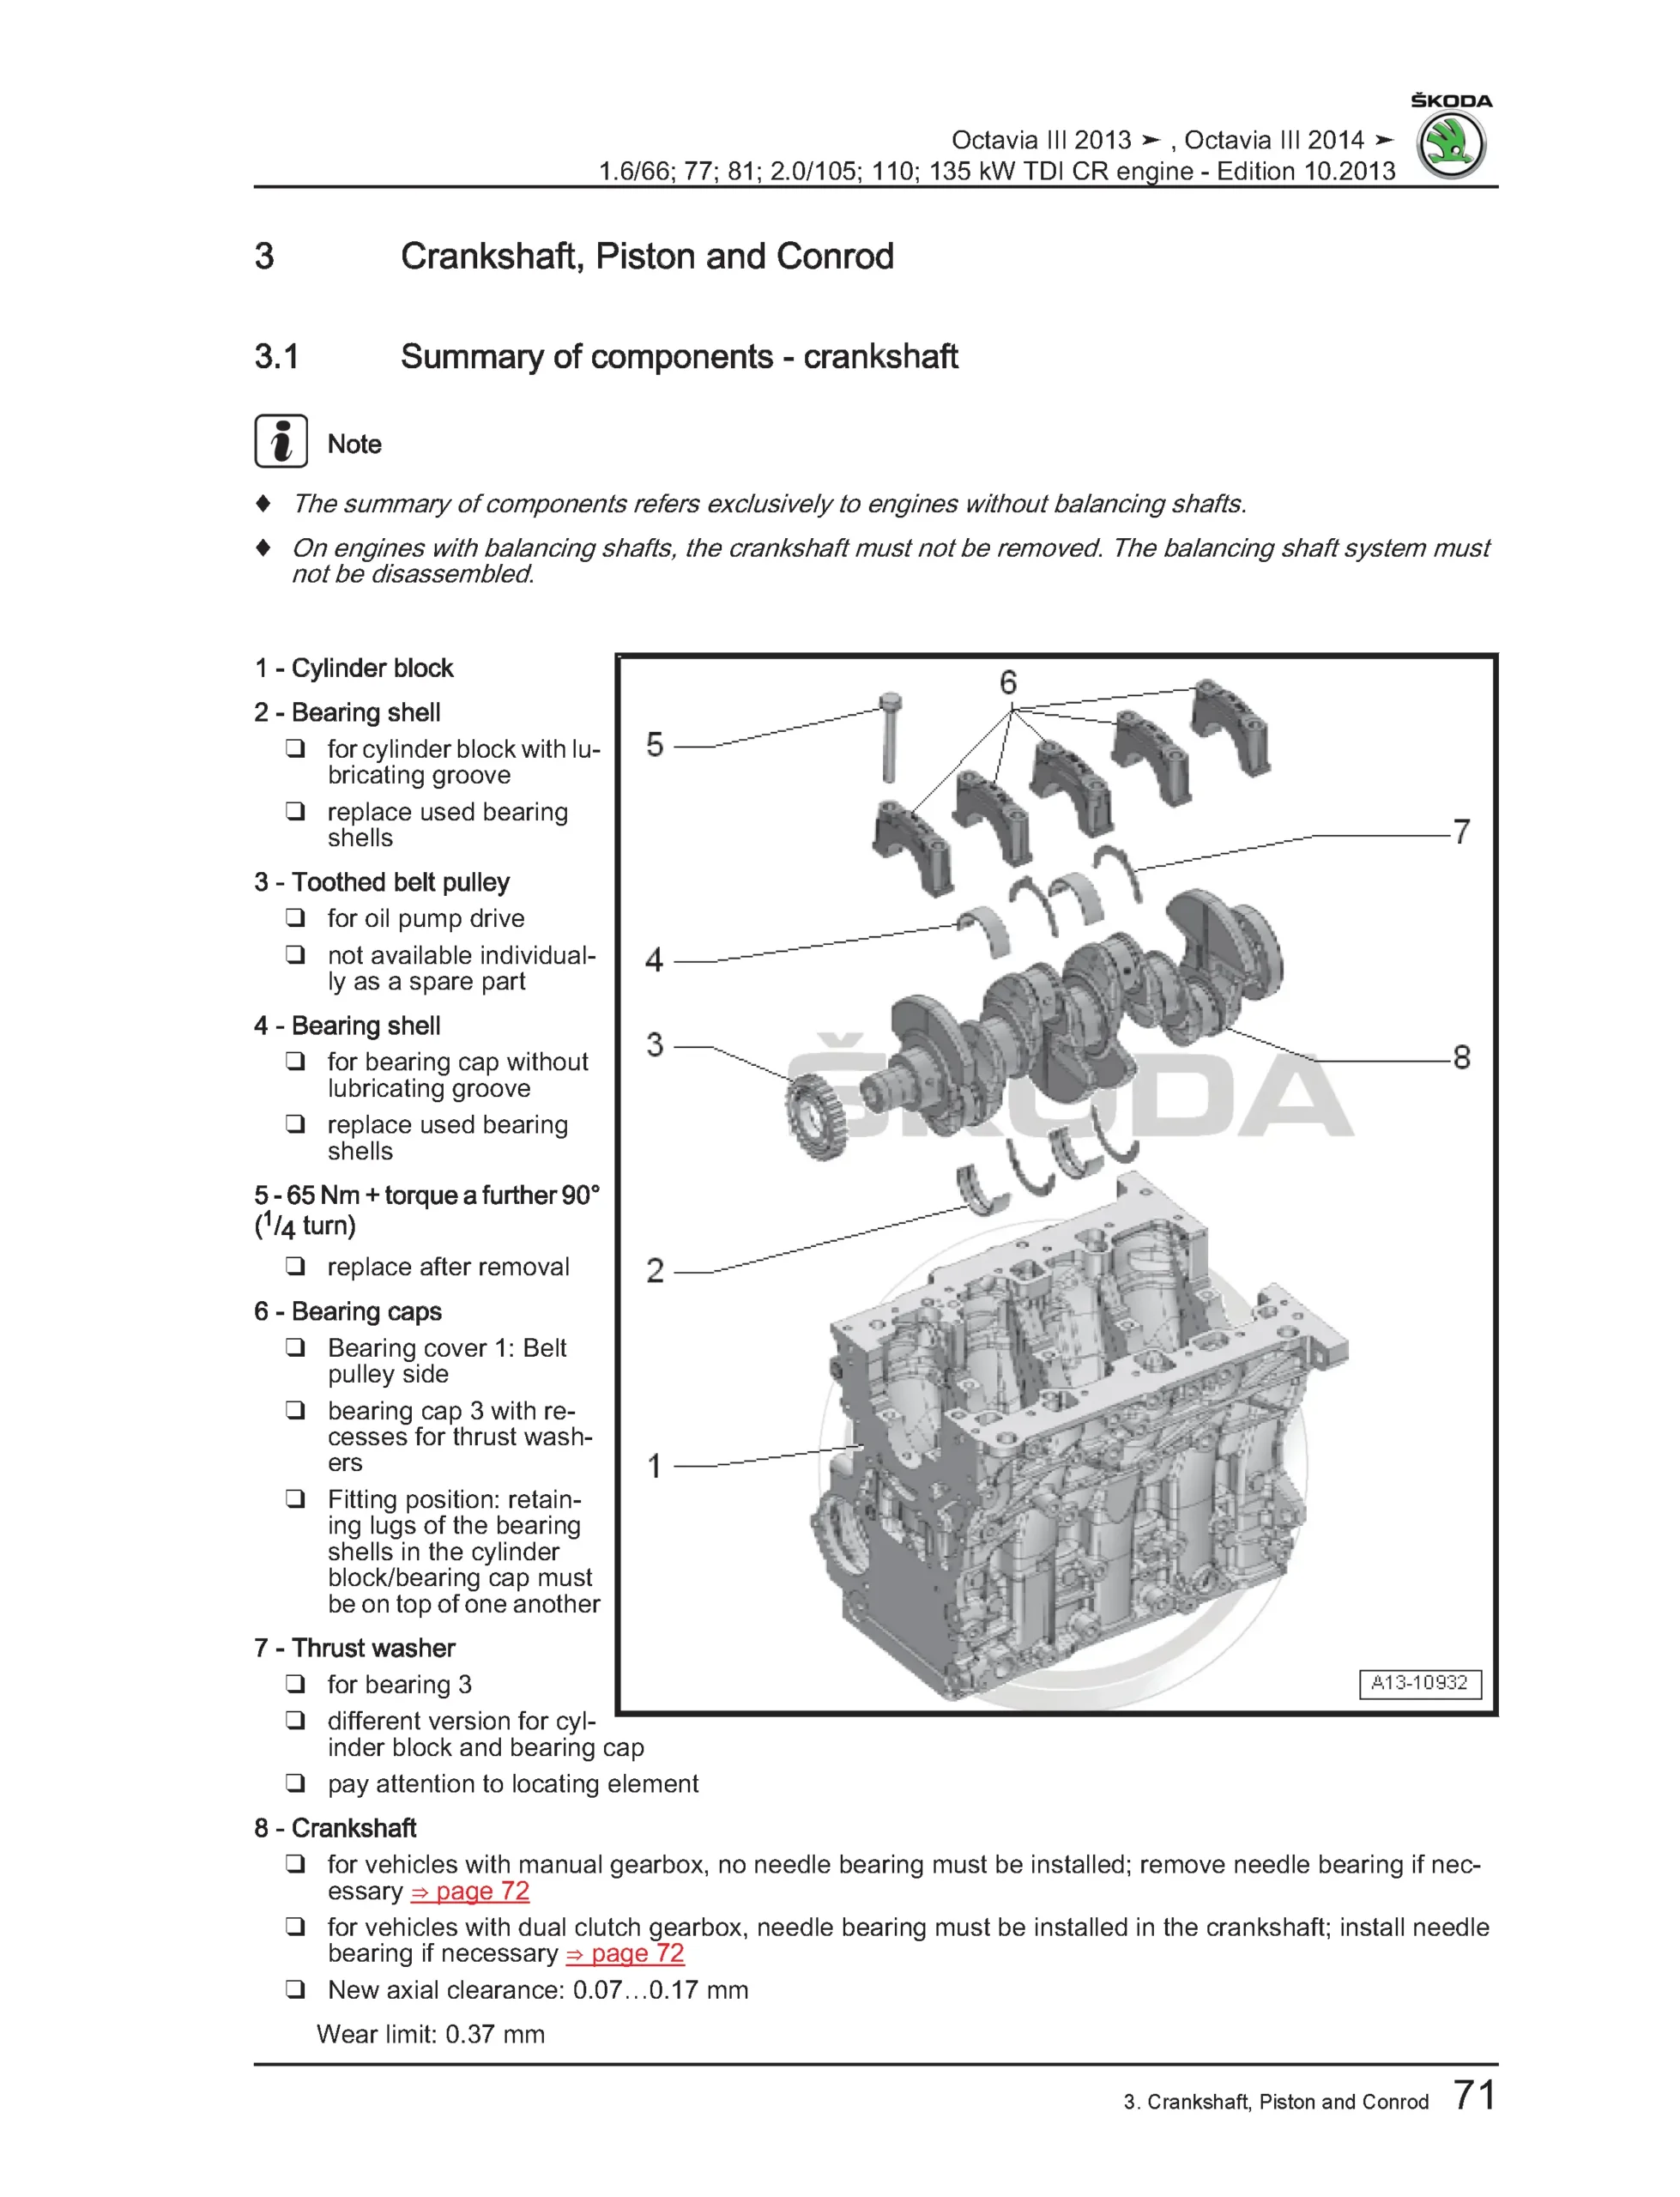
Summary of components – crankshaft
Replacing needle bearing in crankshaft
Assembly overview – piston and conrod
Removing and installing piston
Checking piston projection
Separating new conrod
Cylinder head, valve gear
Removing and installing cylinder head
Assembly overview – cylinder head cover
Removing and installing cylinder head cover
Replacing gasket rings for injection units
Assembly overview – cylinder head
Removing and installing cylinder head
Checking compression
Valve gear
Assembly overview – valve gear
Replacing camshaft gasket ring
Removing and installing camshaft control valve N205
Removing and installing camshaft control
Removing and installing camshaft housing
Checking hydraulic balancing elements
Removing and installing valve stem seals
Valve dimensions
Checking valve guides
Lubrication
Removing and installing parts of lubrication system
Summary of components – lubrication system
Removing and installing oil level and oil temperature sender G266
Summary of components – oil filter holder
Removing and installing oil filter holder with engine oil cooler
Removing and installing oil sump
Removing and installing oil pump
Removing and installing oil pressure switch F1
Removing and installing oil pressure switch for reduced oil pressure F378
Removing and installing oil pressure control valve N428
Testing oil pressure
Cooling
Cooling system
Coolant hose schematic diagrams
Draining and filling coolant
Checking cooling system for leaks
Coolant pump and coolant regulator
Summary of components – coolant pump and thermostat
Summary of components – coolant temperature sender
Summary of components – electric coolant pump
Removing and installing coolant pump
Removing and installing thermostat
Removing and installing coolant valve for cylinder head N489
Testing coolant thermostat
Removing and installing coolant temperature sender G62
Removing and installing charge air cooler pump V188
Removing and installing heating backup pump V488
Coolant pipes
Summary of components – coolant pipes
Removing and installing front top coolant pipes
Removing and installing front bottom coolant pipe
Removing and installing front left coolant pipe
Removing and installing front right coolant pipe
Removing and installing left coolant pipes
Removing and installing rear coolant pipe
Removing and installing rear right coolant pipe
Radiator and radiator fan
Parts of cooling system fitted to body
Summary of components – fan shroud and radiator fan V7
Summary of components – fan shroud and radiator fan V7 and V177
Removing and installing radiator
Removing and installing fan shroud
Removing and installing radiator fans V7 and V177
Fuel supply system
Measures in case of misfuelling
Fuel tank and delivery system
Fuel tank – front-wheel drive
Fuel tank – four-wheel drive
Fuel delivery unit – front-wheel drive
Fuel delivery unit – four-wheel drive
Fuel filter
Summary of components
Draining fuel filter
Removing and installing fuel filter
Fuel hoses in engine compartment
Extracting fuel from fuel tank
Fuel delivery unit removal and installation
Misfuelling protection
Fuel gauge sender and pump components
Accelerator mechanism
Assembly overview – accelerator module
Removing and installing accelerator module
Turbocharging / supercharging
Exhaust gas turbocharger
Summary of components
Removing and installing turbocharger
Replacing vacuum positioning element for charge pressure regulation G581
Vacuum system
Connection diagrams
Checking vacuum system
Hose connections with screw clamps
Charge air system
Radiator and leak testing
Charge pressure sender G31
Checking charge air system for leaks
Mixture preparation – injection
Diesel direct injection system overview
Fuel system schematics
Filling and bleeding fuel system
Checking fuel system for leaks
Injection units and fuel distributor
High pressure pump
Senders and sensors
Lambda probe
Intake manifold and air filter
Engine control unit
Engine noise speaker
Exhaust system
Exhaust pipes and silencers
Exhaust gas cleaning system
Exhaust temperature regulation
Exhaust gas recirculation system
Glow plug system
Glow plug system overview
Summary of components – preheating system
Removing and installing glow plugs
Removing and installing glow period control unit J179
Removing and installing Hall sender G40
Removing and installing engine speed sender G28


Reviews
Clear filtersThere are no reviews yet.